Add a variable text field to your presentation that will be replaced at runtime with the date when the selected data model was last processed. This is a useful way to show how recent the data in your presentation is; the more recently the model was processed, the more up-to-date and relevant the data is.
Since you are adding the text field to your slide as a variable (#ModelProcessedDate), the content rendered at runtime will always reflect the most recent model process date. This means that, if your model is scheduled to be processed each day, the variable will usually be replaced with the date of the previous day.
Note: This feature requires Standard or Enterprise licensing.
Adding a Model Processed Date
From the Toolbox:
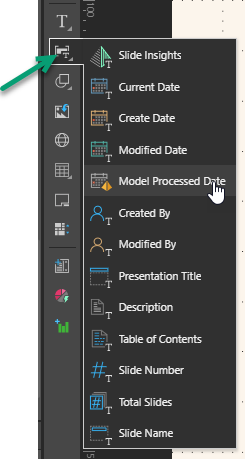
- Right-click Add Text Field (green arrow above) > Model Processed Date.
- Click the canvas at the point where you would like to add your variable.
- Select your data model from the Choose Model panel (yellow arrow above).
- From the Date / Time Format dropdown list:
- Select a Preset Date / Time Format, such as DD/MM/YY. Note: The dropdown groups the preset formats into Date Time, Date, and Time lists.
- Select None if you don't want to display the model processed date. This option allows you to display the model name without displaying the date.
- Select Custom if none of the preset formats satisfy your requirements and you want to use a custom format instead. For details of the custom option, see Custom Date / Time format.
- From the Model Name Option dropdown list:
- Select None if you don't want to display the model's name.
- Select Before to show the model's name before the date.
- Select After to show the model's name after the date.
- Once you are happy with the preview, click Apply to save your changes.
The #ModelProcessedDate tag is added to the canvas and the corresponding panel opens automatically at the bottom of the page:

Tip: To open this panel in future; for example, when you are editing the format for this value; you will need to select the variable text.
The Choose Date Format panel opens. Note that, as you make your selections in this panel, the preview updates to show the model processed date for your selected model in your selected format (blue arrow above).
Click F2 to preview the rendered model processed date in your output content.
Custom Date / Time Format
You can enter your own custom Date / Time format by selecting Custom from the Date / Time Format dropdown list and then describing your required formatting in the Custom Format field (blue arrow, below). A preview of your custom formatting appears below your custom format (blue highlight):

The custom format is described using tokens, based on https://momentjscom.readthedocs.io/en/latest/moment/04-displaying/01-format/
In summary, the date and time values are represented using letters for day (D, DD), month (M, MM, MMM, MMMM), year (YY, YYYY), ordinals for day and month (Do, Mo), hours (H, HH, h, hh), minutes (m, mm), and seconds (s, ss), among others. You can incorporate additional characters directly and escape text strings using [square brackets]. Some values are not implemented since they are not relevant, always check that your format is valid using the preview.
Custom format examples
|
Example token |
Example output |
Notes |
|---|---|---|
|
|
Friday, November 10th 2023, 4:47:33 pm |
Full date and time with 12-hour clock (h) and lower-case pm suffix (a). |
|
|
Friday, November 10th 2023, 16:47:33 PM |
Full date and time with 24-hour clock (HH) and upper-case pm suffix (A). |
|
|
Date: Fri, 4PM |
Prefixed with escaped "Date:" label. |
|
|
11/10/2023 |
Month day year. |
|
|
10th Nov |
Day as ordinal, abbreviated month. |